A stain on the chimney breast, a drip in the back bedroom, and a tube of sealant in the shed. It is an understandable chain of events. The bead goes on along the top edge of the flashing, the leak stops for a few weeks and the problem seems solved. Then the first hard winter rain comes and the stain returns, a little bigger.
Sealant is not a bad product. It is the wrong product for the failure that sits behind many leaking flashings. Lead flashing is a sheet metal strip that is meant to be mechanically held into the wall, then pointed over, so the wall and the metal work as one weatherproof joint. When that hold has failed, a bead of mastic only hides the gap. The metal is still loose and the water still has a way in. Below we cover how a proper joint is made, what fails, what a sealant repair can sensibly be used for and what the lasting repair looks like. It sits within our lead work pages for Taunton.
How lead is held to a wall
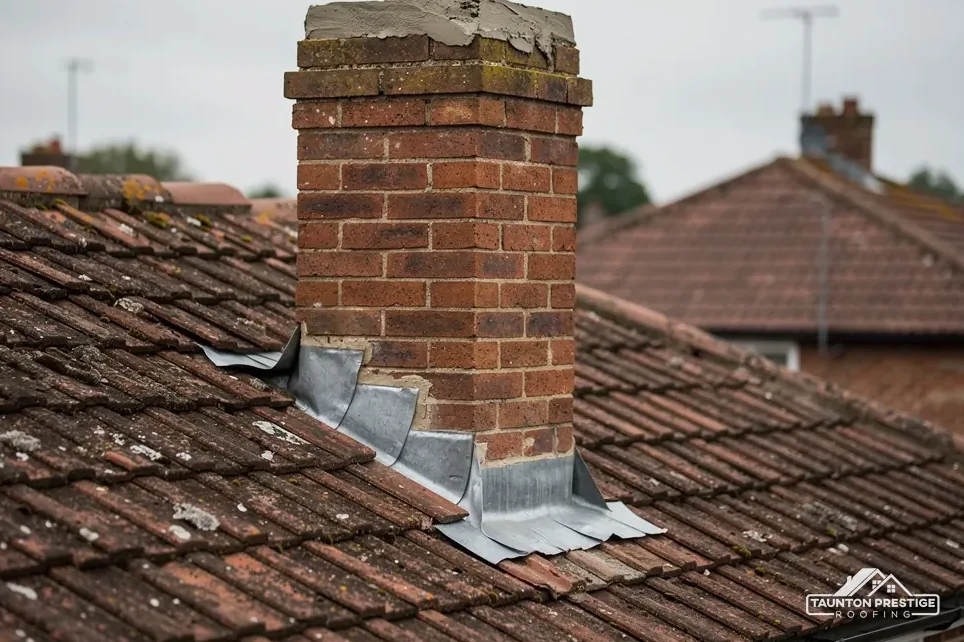
Where a flashing meets brick or stone, the lead is not stuck to the wall. Instead its top edge sits in a narrow slot cut along a mortar joint, which roofers call a chase. The top edge of the lead is turned into this chase, held with small lead wedges that grip it against the masonry and then sealed by pointing the groove with mortar or another suitable filler. Below the chase, the body of the flashing lies over the roof covering or soakers and sheds the water outward.
Every part has a job. The chase gives the lead a firm seat. The wedges are what hold it in; the filler only keeps rain out of the groove. Together they stop the flashing lifting in the wind and stop water running down the wall behind it.
Why does the wall matter as much as the lead?
Because a flashing can only be as secure as the joint it sits in. If the mortar is soft, sandy or eroded, the chase has nothing to grip and the wedges loosen. The lead may be perfectly sound, but the joint it relies on has gone. That is why a roofer looking at a failed flashing checks the mortar first.
Where a sealant has been used in place of this joint, the lead is hanging by little more than a sticky line.
Some buildings use a different method, such as a groove cut into stone or a separate metal strip fixed to the wall to receive the lead. The aim is the same everywhere: a mechanical hold first, with the weatherproofing laid over it.
What goes wrong when it fails
There are four common ways a flashing joint lets go. Knowing which one you have changes what the repair should be.
- The mortar in the chase has crumbled, so the wedges and lead come loose.
- The wedges are missing or too few, and the lead edge has lifted away from the wall.
- The lead has moved, because it was fixed in lengths too long to cope with the way the metal expands and contracts with temperature.
- Water has found a gap at an overlap or a corner and run behind the flashing, regardless of what the top edge is doing.
How can you tell which one it is?
From the ground you can often see a dark line or a gap along the top of the lead, or lead standing proud of the brick. A torch in the loft may show a damp patch or staining below the stack. These are signs of a leak; they do not say why it leaks. Only a close look from a ladder or tower can separate a crumbled chase from a split corner.
Our page on how to tell if flashing has failed lists what to look for. If you can see old mastic along the top of the lead, someone has been here before, and the job is probably bigger than it looks.
Some failures are slow. A joint can open by a hair in one winter and a little more the next, and the owner sees nothing until a stain appears. By then the water may have been entering for a long time, so a stain is a signal to book a look and not to wait and see.
What sealant actually does
Mastic and silicone are flexible coatings. They fill a gap and stick to both edges for a while. That is useful in some places and useless in others, and the roof is mostly the second kind.
Lead moves. It warms in the sun, cools overnight and over a season it expands and contracts along its length. A bead of sealant on top of the joint has to stretch and recover every day, and it sits in the weather with sun, frost and rain all working on it. At some point the bond to the lead or to the stone gives up, and a hairline crack lets water behind the bead where it cannot be seen.
Is sealant ever acceptable on lead?
As a short-term stopgap, in an emergency, to slow a leak until a proper repair can be done, it has its place. A temporary measure is what it is, and it should be described that way. Water coming in gets stopped first with a temporary make-safe, and the lasting fix is planned afterwards.
What goes wrong is when sealant becomes the repair. It covers the sign of failure, the loose lead edge and the open joint, so the problem is harder to see on the next inspection. Water that gets behind a sealed edge may not escape, and it can sit against the brickwork and the timber under the lead for a long time. The damp then spreads further than it would have done without the sealant.
If your roof already has sealant on it, tell the roofer, who will cut it back and look at what lies behind.
Patination oil and the finish of the lead
New lead is bright. Left bare, it reacts with air and rain and develops a pale, chalky surface as it weathers, and that coating can streak across stone, brick and slate below it in the first months. Patination oil is a protective finish that roofers brush or spray onto new lead to guard against that early staining while a stable surface forms.
It is a finish and not a repair. Oil does not close a gap, hold a flashing to a wall or seal a joint, and it does nothing for lead that has lifted. Treat it as the last step on a job done properly, and as a sensible thing to ask about if new lead is going onto light-coloured stone.
Should you ask for patination oil?
It depends on the building. On a pale stone chimney or a rendered wall where run-off would show, it is worth asking whether the roofer will apply it. On a dark brick stack or a roof in the shade, the question matters less. Either way, it comes after the real work and never instead of it.
Ask what product is used and when. Products differ, so we follow the maker's instructions for the oil being applied and tell you what is going on. The finish on lead is a matter of looks and care, and it is separate from whether the flashing is fixed.
What a lasting repair involves
A proper flashing repair starts with the joint, not the lead. The steps are these.
- Cut back and remove any old sealant, along with loose mortar and debris from the chase.
- Check the lead for splits, thin patches and creasing, and decide whether it can be reused or needs to be replaced.
- Rake out or cut a clean chase in sound masonry, repointing the surrounding joints where they have crumbled.
- Dress the lead into the chase, wedge it at close intervals and point over the wedges.
- Check overlaps and corners, then clear the area and photograph the finished joints.
Can the old lead be reused?
Sometimes. Lead that is intact and flexible can be lifted, flattened and refixed. Lead that is cracked, brittle at the folds or worn thin is better replaced, since refitting it only restores the old weakness. We show you photos so you can see which it is.
Does the repair differ on a chimney?
Slightly. A chimney has flashings on all four sides, plus a back gutter behind and soakers beneath. A gable or party wall has a long run of stepped flashing. The principle is the same: the metal is held mechanically, then weatherproofed. You can read how each element sits in our guide to lead flashings explained.
If your roof has been patched with mastic more than once, a full renewal of that run is usually the better buy, and we will say so.
Photos before and after matter in a repair like this. They show the chase, the wedges and the pointing, which nobody sees again once the job is finished.
Cost, life and when to act
People reach for sealant because it is cheap and quick. A local repair of a single flashing runs to a typical UK range of £150 to £250 for chimney lead (MyJobQuote, Sep 2026), and a full replacement of a chimney's leadwork is between £350 and £920, scaffold dependent. Set against that, a cartridge of mastic looks like a bargain, until it is bought a third time.
Lead itself "can last for over 80 years" according to MyJobQuote. That is a lower bound, and it describes lead fitted properly. A failed joint is a fault in the fitting and not a sign that the metal has run out of life. Fixing the joint can give the lead years more.
How long can you leave a leaking flashing?
Not long. Water that tracks behind lead can reach the timber boards and the roof structure, and rot is slow to show. A small leak is cheaper to fix than the damage it grows into. Take photos of any stain, note when it appears in wet weather and book a survey.
If sealant is already on the roof, leave it alone until the roofer has seen it. Cutting it back yourself risks the lead and your safety.
For a full picture of what leadwork costs and what sets the price, see our guide to how much leadwork costs.
A repair done twice costs more than one done properly, because the access, the call-out and the disruption are paid for each time.
Sealant and flashing questions
Can I use silicone on a leaking lead flashing as a temporary fix?
In an emergency a bead can slow a leak until a repair is done, but treat it as a stopgap. It does not hold the lead, and it can hide the open joint. Tell your roofer it is there so they can cut it back and see what has failed.
What is a chased-in lead flashing?
It is a flashing whose top edge sits in a slot cut along a mortar joint, held with lead wedges and pointed over. The wedges hold the metal; the pointing keeps rain out of the groove. It is the traditional way to fix lead to brick or stone.
Does new lead need patination oil?
It is optional, and it is a finish, not a fix. Oil is brushed or sprayed on to limit early white staining that can run onto stone or brick below. Ask your roofer whether it suits your building, and follow the maker's instructions for the product used.
More on this subject: Lead work in Taunton